|
The drive chain is probably one
of the most important and probably one of the most neglected components on
your mountain bike. It transfers a majority of your pedaling force to the
rear hub, contains more individual moving parts than your whole bicycle and
truly requires the most lubrication. Many riders never think of their drive
chain, even fewer understand the importance and affect it has on our
physical and mental riding performance. This technical brief will speak to
importance of drive chain lubrication as it relates to mountain bikes and
review some interesting points that you may or may not have known.
Technical Brief Sections:
Below are the following sections
covered in this technical brief. Each section provides a basic level of
information relative to the topic. This document does not cover all
technical, engineering and or maintenance aspects of roller chain
lubrication.
1.0 Anatomy of a Mountain Bike
Drive Chain.
2.0 Anatomy of Roller Chain
Lubricate.
2.1 Which Lubricant Brand to
Use?
3.0 Inspecting your Chain.
3.1 Check for Binding.
3.2 Check for Pin Alignment.
3.3 Check for Chain Growth.
4.0 Cleaning your Chain.
4.1 Cleaning ON the Bike.
4.2 Cleaning OFF the Bike.
5.0 Chain Lubrication.
5.1 Lubricant Viscosity.
5.2 Viscosity Grades.
5.3 Applying Lubrication.
5.4 Over Lubrication.
6.0 Technical Wrap-up.
1.0 Anatomy of a Mountain Bike
Drive Chain.
To appreciate the importance of
drive chain lubrication, we first need to identify the structure of the
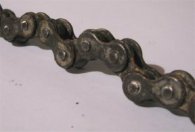
average mountain bike chain. Bicycle drive chains come in all shapes and
sizes but they all primarily do the same job�transfer your pedaling force to
your rear hub. Bicycle drive chains are classed as �Roller Chains� in
non-related industries outside of the bicycle industry. Roller chains are
one of the most efficient and cost effective ways to transmit mechanical
power between to shafts, i.e. the crank shaft and rear axle. The general
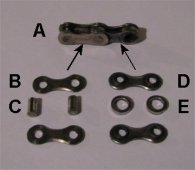
construction of a roller chain consists of two alternating link assemblies
when put together create a chain segment. The outer link assembly consists
of 2 outer link plates containing 2 pressed-in cross pins. The inner link
assembly consists of 2 bushing less inner plates less and 2 slip-fit
rollers. One chain segment consists of 8 separate components with 6 moving
contact points. Apply this to the average chain length (45 segments) for a
mountain bike and you have 360 separate components with 270 moving parts. To
make matters worst, all these moving parts are directly exposed to the
elements of riding (water, dirt, rocks etc) unlike pivot bearings and
headsets.
Now�there are various roller
chain designs for mountain bikes. You have bushing-less chain links,
hollow-pin point links, even mixing metal composition between outer and
inner plates to reduce friction. In the end, none of these designs eliminate
pivot joints of a chain segment and the importance of lubrication.
2.0 Anatomy of Roller Chain
Lubricate.
There are thousands of lubricant
brand names claiming to be the best for your mountain bike. The reality is
all manufactured lubricants in the United States and many other countries
must conform to ASTM D 2422 Standards. If you do not know what this is or
never heard of it, simply Google search the standard and you can read about
it. This standard classify all petroleum-base fluid lubricants and to those
non-petroleum materials which may be readily blended to produce fluid
lubricants of a desired viscosity. We can write a book (but who needs
another one) regarding the chemical, bonding and distillation of lubricating
fluids, but that is not what this brief is about. So, if you want to learn
more about lubricant composition, feel free to look up the ASTM Standard.
With that said, you really have
only a hand full (as relates to bicycle chains) of lubricant types to choose
from. Manufactures mix or blend additives in to these standard lubricants to
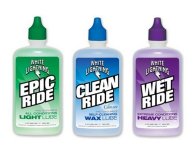
create a well balanced fluid for a specific application. Thus you have
specific bicycle lubrication oils for wet, dry and muddy conditions.
All these specific lubrication
come at a premium price and do serve their purpose. However, if you are not
one to maintain you chain on a weekly basis, much of these lubricant
benefits are lost and become a waste of money. There are pros and cons
regarding the use of these specialty lubricants and many people claim simple
non-additive lubricants work better and are far cheaper. This is a true
statement, but it ultimately boils down to your preferred lubrication
method, how often you apply these oils and under what condition you�re
applying them. There are no existing �certified� publications that prove
hands down a particular blend or non-blend of lubricant is more superior for
roller chains. If this publication did exist, the ASTM D 2422 Standard would
require republication.
2.1 Which Lubricant Brand to
Use?
Thousands of lubricants exist to
choose from and most have a specific application. Refer to Section 5.2 of
this technical brief for more information regarding viscosity grades. What
is important for the average mountain biker to understand is the viscosity
of the lubricant used. The standard roller chain used on mountain bikes is
1/2 inch making the areas requiring lubrication small. If you were to use a
high viscosity lubricant like 10W30, all you would really do is coat the
outside of the bike chain missing the internal components. A low viscosity
lubricant like machine air-tool oil will completely lubricate your bike
chain but you loose frictional performance. Bottom line, which lubricant to
use will ultimately depend on your frequency of riding, elements you ride
in, style of riding and how often you want to maintenance your chain. Riding
in the Moab (Utah) may require a wax or Teflon additive lubricant blend to
keep dust and light sand of sticking to the chain. Riding here, in New
England, a heavier viscosity lubricant may be required to create a virtual
seal keeping soil particles from contacting critical pivot points inside the
link assembly.
Dieselbikes has not conducted
studies between different types, brands and blends of lubricants available
to mountain bikers, so we cannot state one is better over the other. What we
can state are a few important factors that determine the type of lubricant
to use. These factors are frequency of riding, elements you ride in, style
of riding and how often you want to maintenance your chain. Use these
factors to help determine the type of lubricant to use, then compare price
to determine how much you want to spend.
3.0 Inspecting your Chain.
Since this article is written
towards aggressive mountain biking (freeriding/downhilling including), there
are some inspection points to look for on your chain before you go through
the process of cleaning and re-lubrication. Chains that are put through
harsh riding conditions and not maintained can result in aggravating
drive-train problems. Furthermore, if you spend time simply cleaning then
applying oil but never bother to checking each link, you will just carry
over the problem and continue the aggravation. What we are suggesting does
not need to be conducted every time you ride, but should become a schedule
habit depending on your riding style and frequency.
There are a number of inspection
points when checking your bike chain; however, we narrowed it down to what
we believe are 3 important inspection points to look for. Note: to conduct a
good inspection, it is best practice to remove the chain from the bike.
3.1 Check for Binding.
Binding of connecting links can
cause havoc for shifting, slack control during rear suspension movement and
cause power slippage right when you need the power most. Binding may result
from contamination around both link plates or between the roller, bushing
and pin components. Damaged link plates caused from a rock that slammed into
the chain or oxidation (rust) of the link assembly may also result in
binding. You can simply check for binding by rotating each link by hand or
over an old sprocket. If you come across a binding link you must pay strict
attention and identify the cause of binding. Working the connected links
back and forth in a bath of cleaning/lubrication solution is one best
practice. If you are unable to resolve the links from binding, you may want
to consider replacing the chain. Removing the links and replacing them is an
option, but any time you re-install a link pin, you create a weak point in
the assembly.
3.2 Check for Pin Alignment.
Pin alignment is critical to the
chain�s strength and your personal safety when riding. Since most mountain
bikes have one or two derailleur for shifting, your chain becomes subjected
to torsional forces that apply uneven stress to the pins increase wear and
possible misalignment. You can check for pin alignment by visual inspection
or laying the chain on its side and running a small metal (or plastic) ruler
across the pins to visually see if they are all at a similar height. If you
find a pin is misaligned or appears to be working its way out, you may want
to consider removing this link assembly and try living with a slightly
shorter chain length. Again, any time you�re re-installing a link pin, you
create a weak point in the assembly. Replacement with power-links are also
an option but sometimes not recommended.
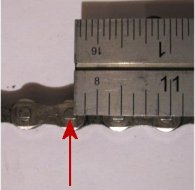
3.3 Check for Chain Growth.
Chain growth and chain stretch
are two completely different effects that occur with roller chains. Many
bicycle articles use these terms interchangeable with each other and can be
misleading. In short, chain growth is the physical wear of link assembly
components and chain stretch is the physical deformation of link assembly
material. ASME Chain Standards Section B29 covers a good majority of these
two different characteristics.
Take it for what its worth,
industrial standards for 1/2 inch roller chain growth is less then 1% per
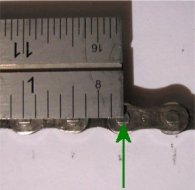
foot. This means if you conduct a simple measurement with a ruler and
measure a 1-foot section of your chain by placing the 0� mark on the center
of any link pin then view the corresponding link pin located at or near the
12 mark; if the last link pin is greater then 1/16� (0.0625) past the 12
inch mark on your ruler, the chain would be out of specification and
possibly unsafe to use. There are a number of measurement tools to check
chain growth accurately, but the simple ruler method is sufficient for the
every day rider.
4.0 Cleaning your Chain.
Just as lubricants, there are
thousands of cleaning fluids with brand names claiming to be the best. In
short, for us mountain bikers we have two basic choices for cleaning fluids,
either solvent-base or water-base. Both have their pros and cons and argued
across industry professionals day and night. Since the majority of us will
purchase our cleaners from retail stores, our choices will be limited to
somewhat environmentally friendly fluids.
Solvent-base solutions are
excellent as a cleaner, but tend to have rapid evaporation and require more
safety precautions to avoid an accident. Water-base solvent solutions are
also excellent cleaners, but tend to leave a water residue which can result
in oxidation (rust). You can avoid oxidation by heating your chain (example:
hair dryer) to accelerate evaporation of this water residue before allowing
oxidation to begin. For the most part, the choice is yours on which type of
solvent to use.
In our opinion, the more
important factor is the method in which you clean your chain and how often.
If you ride all the time and the only time your chain gets cleaned is when
it rains, then you are just asking for an accident to happen. Once again,
there are two basic methods to clean your chain. You either clean it on the
bike or off the bike, it�s that simple. The technique you decide to use can
be debated until the cows come home. This technical brief is not going to
dive into cleaning techniques because what routine, tools and solvent
solution you use may work for YOU but not for someone else. The point we
want to make is the following�You will effectively clean, inspect and
lubricate your chain better and faster if you remove it from the bike. Why
is that you may ask�well here is the short answer.
4.1 Cleaning ON the Bike.
If you clean your chain on the
bike you have a good chance a fair amount of foreign contamination will
remain on or inside the link assemblies. Even using best cleaning practices,
if the chain is dirty, then your drive train is dirty. Every time you wipe a
section of chain, the minute it passed through the front sprocket or rear
cog set, you are transferring cleaning solution and contamination
back-an-forth. Obviously if you take time to clean your chain, you should
spend some time wiping down the rest of the drive train, but your cleaning
techniques are limited when leaving the chain on the bike. We are not saying
you should never clean your chain this way�just keep it to a limited basis.
4.2 Cleaning OFF the Bike.
We prefer this method because it
offers an unlimited amount of cleaning techniques that will work for you.
Using this method also provides a better means to check for link assembly
damage, chain binding and component wear. Again, if you spent the time
cleaning the chain and place it back on a dirt drive train, you have just
defeated the purpose of cleaning it.
If we boil this all down to
basics, your primary goal in cleaning the chain is to ensure you have the
minimal amount of foreign contamination left before applying lubricating
fluid. The technique in which you clean your chain is totally up to you.
There is plenty of available information on the web regarding different
cleaning techniques for on the bike and off the bike method. Find what works
best for you and run with it.
5.0 Chain Lubrication.
Frequently lubricating the bike
chain is the most important step in maintaining efficient power transfer
between your crank shaft and hub assembly. Many bicycle industry articles
regarding chain maintenance do not address the full importance and benefits
of lubrication only stating lubricants simply extend the life of your chain
and sprockets. Bicycle chains will perform better and last longer when
timely and adequate lubrication is provided, but lubrication also provides
these important benefits:
a. Protects and drastically
reduces frictional wear of the pins, bushings, rollers and link plates.
b. Cushions impact loads as the
link assembly contacts the sprocket.
c. Dissipates frictional heat
created during operation.
d. Assist in flushing away
foreign materials on the rollers
e. Creates a virtual fluid seal
between the link pin, bushing and roller.
f. Helps retard oxidation.
Because mountain bike chains are
accepted to operate in harsh environments, lubricating for longer-life may
not be the best practice. There are a number of circumstances that can occur
during bike rides that will destroy the chain. Lubrication for chain
performance may be the best approach so you can limit drive-train issues
caused by poor chain performance.
5.1 Lubricant Viscosity.
Just as stated in section 2.0 of
this technical brief, most manufactured lubricants must conform to ASTM D
2422. ASTM D 2422 Sub section 97 defines the categories of lubricant
viscosity. Many bicycle industry articles state to use a low viscosity fluid
for your bike chain, but what is considered low viscosity? First, let�s
define what viscosity means. The basic definition of viscosity is the
measure of the lubricant�s (oil) resistance to flow (shear stress) under
certain conditions. If you apply a high viscosity lubricant on your chain,
the lubricant may want to stay in one place when pushed (sheared) by a
moving mechanical component and NOT reach all the internal critical moving
components. By applying a low viscosity lubricant, the lubricant will easily
be pushed (sheared) by moving mechanical components reaching internal
critical moving components and create a uniform film of protection.
Viscosity is an important factor because we must lubricate the outside of
the chain allowing the lubricant to work (penetrate) its way to the internal
components.
5.2 Viscosity Grades.
In 1975, the International
Standards Organization (ISO) in unison with American Society for Testing and
Materials (ASTM) and a host of other United States and International
organizations developed the International Standards Organization Viscosity
Grade, ISO VG for short. The ISO VG chart ranges from ISO VG 2 through ISO
VG 3200 identifying categories of lubricant properties. What this means for
YOU the mountain biker is having the ability to physical compare the
performance of any bicycle chain lubricant of similar properties based upon
your specific requirements.
There is no standardized chart
that categories the ISO VG range into low, moderate or high viscosity for
all industries due to the tens-of-thousands existing applications. The rule
of thumb for the ISO VG chart typically states: the lower number indicates a
lower viscosity. But just because a lubricant has a low viscosity, does not
necessarily mean it should be used on a bike chain.
The typical viscosity range for
roller chains used on mountain bikes is ISO VG10 to ISO VG32. This range
typically provides performance characteristic required for a mountain bike
application. However, you would not want to use low viscosity motor oil
because the lubricant is designed to create a thin film under high speed
application in high temperature environments. Using low viscosity motor oil
on a bicycle chain will do nothing other than attract more foreign
contamination. The bicycle chain application will never reach the rotating
speed or temperature required for the lubricant to perform its designed
function.
In most cases, manufactures and
distributors of bicycle lubricants are not just blowing smoke when they
state their lubricant is for use on bicycles. Many have done their homework
and created or re-packaged a blend of fluid that contains the right
performance characteristics for bicycle chain applications. It becomes a
matter of argument whether or not purchasing bike chain lubricant, blending
your own lubricant or using chain saw oil (example) is the best choice.
Refer to Section 2.1 of this technical brief for more information regarding
which lubricant brand to use.
5.3 Applying Lubrication.
Methods to apply lubricant can
be considered an art form. Several common techniques exist and argued by
industry professionals. This technical brief is not going to dive into
application techniques because what routine, tools and lubricants you use
may work for YOU but not for someone else. Regardless what technique is
used, you either apply lubrication when the chain is on the bike or off the
bike.
When applying lubrication, one
best practice is to apply a droplet of fluid on the top of each link
assembly pivot point vertical to the roller. This is the shortest distance
for the fluid to travel and provides direct lubrication to critical moving
components. Running lubricant directly over the center point of the roller
will effectively require more fluid, creating waste and over lubrication.
Choose a method of application that works for you but remember your goal is
to lubricate the internal moving components and contact points of each link
plate.
5.4 Over lubrication.
Over lubrication of a bike chain
can be just a damaging as not having any lubrication. If too much
lubrication is applied to the chain, it creates a thick film that works
towards attracting foreign contamination rather assisting in flushing it
away from the rollers. A sandpaper effect occurs as frictional forces
increase due to foreign contamination resulting in poor chain performance.
Once lubricant has been applied,
ensure you have wiped the chain so no extra fluid is present between the
rollers or droplets form on the links. A simple method to draw extra
lubricant off the chain is to place each side of the chain on a cotton towel
(lint free or any absorbent material) for one minute. The towel will draw
excess surface fluid, but leave a residue on the chain surface.
6.0 Technical Wrap-up.
We hope this technical brief
stressed the importance of chain maintenance and provided additional
information you may not have known. Because the bike chain has the most
moving parts and continuous frictional contact with other metal components,
by default it becomes the most serviceable item on your mountain bike.
Proper cleaning and lubrication will not only extend the cycle life of your
chain, but more importantly dramatically increases the performance of your
drive-train giving you more confidence when you ride.
Creating an individual
maintenance schedule based upon your frequency of riding, elements you ride
in and style of riding will resolve a number of aggravating drive-train
issues at can result or be influenced by the chain. You should also
determine at what point you replace the chain. If you decide replacement is
only determined by chain growth, be warned that chain stretch can occur
unnoticed resulting in failure at the wrong moment.
We honestly believe the best
practice is frequent chain maintenance and replacement annually. This may
sound overkill, but your bike chain is continuously under various loads,
withstands extreme torsional force and is directly exposed to the elements.
Probably the worst conditions for a mechanical assembly to operate in and
YOU rely on it every single time you pedal.
|